The Apollo WDS (Weapons Detection System) includes a built-in Electrical Noise or Interference test that checks system health and validates sensor performance. Run this test when setting up the unit, after relocating it, or when troubleshooting detection issues.
The interference test runs an automated self-check of the Apollo's coil, signal, IR, and XY sensors. Once complete, it prompts a single person to walk through the unit to validate the results. The entire process takes approximately 2 minutes.
Steps
1. From the Home Screen, tap the Shield with Magnifying Glass icon.
This icon is located on the Apollo's main display. Tapping it initiates the Electrical Noise / Interference test sequence.

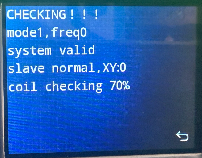
2. Wait for the self-test to complete (approx. 2 minutes).
The screen will display a live progress readout. You will see status lines such as:
NOTE: ? Do not walk through or touch the unit while the self-test is in progress.
3. When prompted, have one person walk through the Apollo.
After the self-test finishes, the unit will prompt for a person to pass through. This step validates that the sensors respond correctly under real conditions.
4. Review the results on the screen.
A passing result will display all statuses as "normal" and "No XY" (no Electrical Noise / Interference detected). Example output:
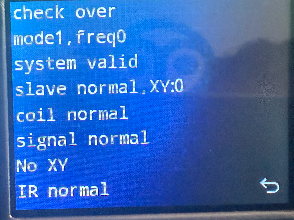
Result:
No mechanical noise when running this electrical noise test.
If the Test Fails
If any status reads abnormal or the test does not complete, try the following:
- Ensure no large metal objects or Electrical Noise sources are near the unit.
- Clear the area and rerun the test.
- If the issue persists, contact Athena Security Support.
Need help? Contact supportwe@athenasecurity.com
Was this article helpful?
That’s Great!
Thank you for your feedback
Sorry! We couldn't be helpful
Thank you for your feedback
Feedback sent
We appreciate your effort and will try to fix the article